The Ultimate Wild Camping Kit List
Last Updated on
On the hunt for a wild camping checklist? You’ve come to the right place :). This post was written a few years ago after a wild camp in the Lake District, and most recently updated in 2023. Hope it helps your wild camping planning!
Over the Easter weekend, a friend and I did a 4 day / 3-night wild camp and hiking trip in the Lake District. It was a stunning, sunny weekend, so we took a lot of pictures. I thought I would combine some of those pictures with a post on some top tips and some kit list items, designed to keep your pack light, and save you space on your camping trip.
Wild camping is brilliant fun, and you can get some incredible, unique scenery because you might be spending a night or two with nobody else around, in a place that is far from civilisation.

They key to wild camping – and backpacking in general – is to keep your pack as light as possible, and maximise space. The last thing you need is a heavy pack and a sweaty back!
The first important rule is it’s worth investing in some good, lightweight kit and equipment. In all honesty, all the items I’ve listed below could break the bank if you bought them all together, but if you split the cost and share items with friends and fellow backpackers, and build up the kit over time, you shouldn’t have any issues, and it will pay dividends in the long term. Here’s the checklist:
THE BULKY WILD CAMPING KIT LIST ITEMS
The biggest and heaviest items in your rucksack are likely to be your tent, your stove and your sleeping bag. Given the fact that all three are vital for your survival in the wild, it’s worth researching and buying the best ones to suit your upcoming trips.
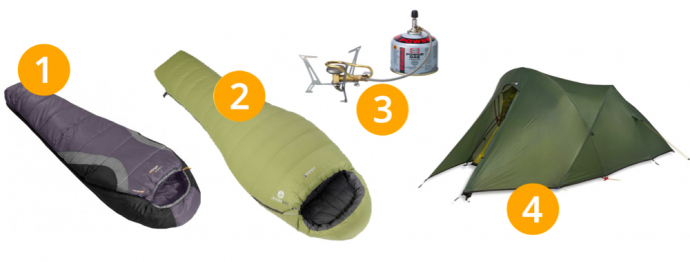
1 – I use a simple Vango Nitestar 350 sleeping bag for the spring and summer. It’s very important to choose the right sleeping bag for the right season and temperature!
2 – If you’re out camping in the winter months, and the temperature is likely to drop below freezing, make sure you use a 4 season sleeping bag. These are a little heavier, but worth their weight in gold when they keep you warm and cozy in the tent and it’s freezing outside. I recommend Vango 4-season sleeping bags for the best performance and value. The one shown is the Vango Venom 600, but you can pick up a good 4-season sleeping back in retail stores. If you’re on a budget, go for the Deuter range in Go Outdoors.
3 – A single stove burner will be needed to cook your evening meals, breakfast (if you like porridge!) and make those all important cups of tea. I use a simple Primus Express spider stove – small, cheap, and good grips so pans don’t slip off the top when cooking. Gas cartridges cost between £5 – £10. A 250g Cartridge should easily last you for 2 evening meals, 2 breakfasts and 4 mugs of tea. But remember, lower temperatures means more gas will be used when cooking.
4 – Choosing a lightweight tent is very important if you’re hiking long distances. I’d recommend the Vango Nevis tent. It says it’s a 2-man tent, but it’s VERY tight, so it’s best used as a 1-person tent.
KIT FOR THE TENT
You won’t need too much in the tent when you’re sleeping on a wild camp. A pack of cards is always useful, as well as a head torch so you can see what you’re doing, and where you can wee if you get a call of nature during the night!
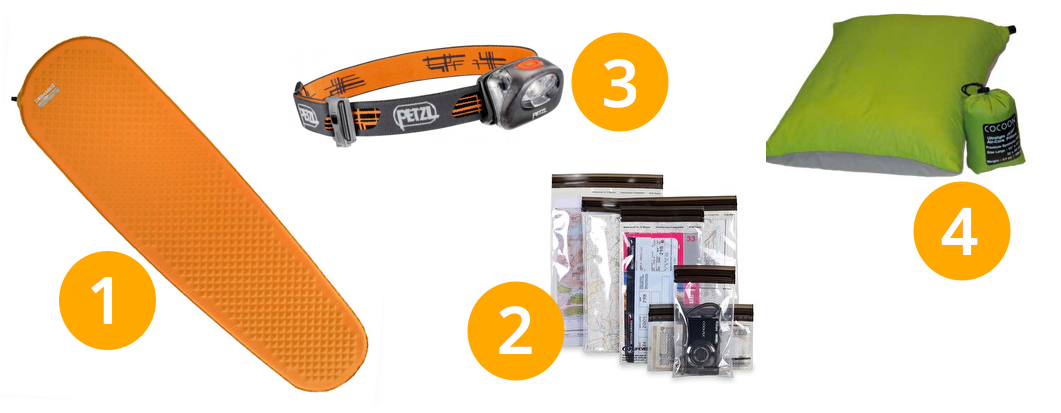
1 – Pack a Therm-A-Rest. These are much more efficient than roll mats, and will keep you much warmer and drier, as they provide a nice layer of air between you and the ground.
2 – Dry bags. If you’re all zipped up nice and snug, the tent will retain a lot of moisture. Keep your phone and money in one of these during the night and it will keep them dry.
3 – I use a Petzl head torch. Good lighting, lightweight and sturdy.
4 – An inflatable camping pillow means you don’t have to use a stuffed jumper that may or may not be dry / clean. These are small, lightweight, and a nice little luxury.
WILD CAMPING KIT FOR DURING THE DAY
Your rucksack is all packed up, and you’re ready to explore the sights. Here are my key items to keep you comfortable, dry and hydrated during your hike.
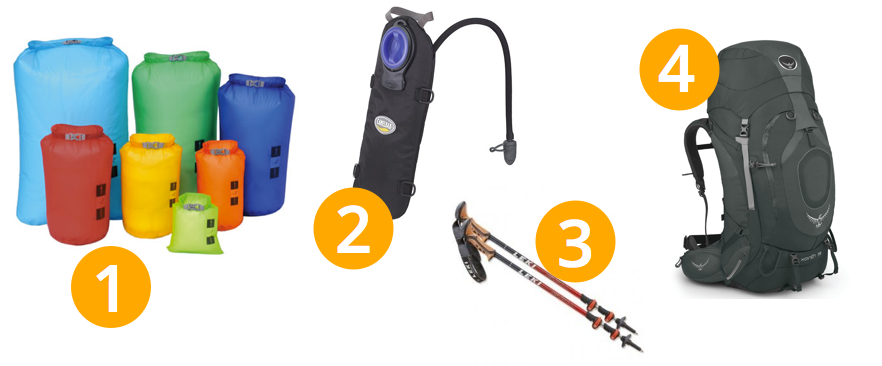
1 – Dry bags – these are invaluable for any kind of hiking, camping or backpacking. They come in all different shapes and sizes, and should be used to keep everything dry. If you’ve been to Thailand, you may have seen these before, slung over the shoulders of long boat owners.
2 – A 3 litre Camelbak. Camelbaks come in different sizes, but 3 litres should get you through the day and night no problem. They also have clips and straps, so if you’re struggling for space inside your rucksack, you can clip it and strap it securely to the outside. You can then replenish using running water in a stream or river, and pop some chorine water purification tablets in.
3 – Choosing the right trekking pole is important. Not only should your poles be strong, they should also be as lightweight as possible. I went for the Leki Corklite poles, but the Black Diamond Ergo Trail walking poles are equally as good.
4 – Rucksacks are a very important purchase decision, and you should take your time choosing the right pack for your adventure, and one that is most comfortable to you. I have around 4 rucksacks – some for day hike, some for weekend hikes and larger ones for expeditions, backpacking and camping. Here I’ve gone for an Osprey 75 litre, which should have room for everything, if you split the equipment between you and one other person. Any Osprey pack around that size is also good.
WILD CAMPING KIT FOR THE EVENING / MORNING
Ah, sunset and sunrise. The perfect time for a cup of tea, and watching the sun hit the landscape around you. But it may also be a little chilly. Here’s my kit list of everything you’ll need in the morning and evening!
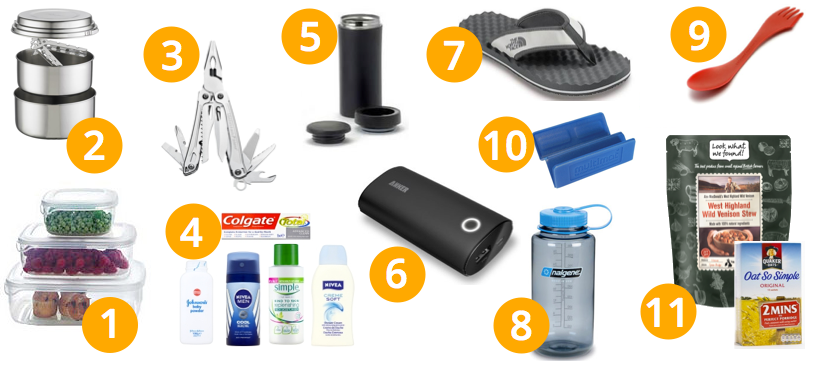
1 – Dry boxes – similar to dry bags, dry boxes keep things dry, but the plastic boxes mean you can put things inside that you don’t want to get squashed or broken. Tea bags, cheese, matches etc.
2 – Pots and pans for cooking – or or two pans with a lid should suffice if you’re only cooking with water. Go for a non-stick cookset option as it makes washing up easier! Pans this size should be able to fit your spider stove inside too 🙂
3 – Swiss army knife or Leatherman – ideal for cutting things, slicing things and general kit DIY. Always take one of these with you whenever you go backpacking or camping.
4 – Small packets of tissues and miniature toiletries – great for saving space!
5 – Travel mug – just the right size to hold a good cup of tea or other beverage, and the flash technology will keep it cool / warm.
6 – Power Monkey / portable charger – I use my iPhone for photography, so keeping it charged is imperative. I use the Anker Power Bank range, which from experience gives an iPhone two full charges.
7 – Flip flops & baby powder – I took flip flops on the Inca Trail hike, and was the envy of everyone else. After a days hike, there’s nothing better than airing the feet, and treating them to some baby powder. Look after your feet and they will look after you!
8 – Nalgine bottle – a nice additional water source to collect water from rivers and streams to pour into your cooking pot. When empty you can also stuff it with clothes / other items to save space.
9 – Spork – the ultimate travel cutlery item. Don’t leave home without one!
10 – Folding sit mat – everyone laughs at me for packing this for each trip. But it keeps your bum warm during lunch and is the perfect assistant whilst you change footwear.
11 – Food packets and pouches – these are perfect for wild camping. Small, compact and can still provide a great meal, all you need to do is add water. Take porridge pouches, a bag of rice, and stews pouches, and your evening meals and breakfasts are sorted. Try the beef chilli con carne to really make other campers jealous 😉
OTHER WILD CAMPING TIPS
For lunches, we generally take chorizo, cheddar cheese, honey and oatcakes. Bread takes up space and gets squashed, and honey can be used to sweeten your porridge in the mornings!
 |
| Wild camping lunch (multiplied by four!) |

Wash your socks and pants in a river or lake. Dry them as best you can, then stuff them inside your sleeping bag during the night. You will be amazed how dry they are in the morning!
Hopefully this wild camp kit list will help guide you for any trips you’ve got planned! I’ve done wild camping in England, Scotland and Wales, and climbed most of the mountains in the UK, so if you need any advice, please don’t hesitate to get in touch.
Let me know how you get on! 🙂
Note – Checklist last updated July 2023.
Disclosure – this post contains affiliate links to external sites. This means I get a small commission for anything you purchase after clicking the links. It’s not much, but it does allow me to pay for my web hosting 🙂


Hi everyone, I've had a couple of comments about 'pooing' in the wild, so I thought I'd update the post with a bit of advice here.
First things first – when it comes to wild camping and hiking, carrying a shovel around can add unnecessary weight (besides being a pain in the ass to carry).
The general rules for disposing of bodily waste in the wild are two fold…and the same rules that apply to most aspects of camping: 1) use common sense, and 2) leave no trace.
How far do you need to be away from the camp area to go for a pee? Up to you – you might walk 100 yards away before you head to bed, but if you wake up in the middle of the night with a call to nature, I'm sure the wild animals wouldn't begrudge you going 20 feet 🙂
As for doing a 'number two', the main issue is tissue paper. I would head about 100 yards away and find a decent spot. By decent spot I mean somewhere that has soft ground that is fairly easy to dig, but also an area that has sphagnum moss. You can just about use a tent peg or the heal of your boot to dig a hole (or rocks if available), do your business, and then use the sphagnum moss as a substitute to toilet paper. It may be a little moist, but it's gentle on the bottom 🙂 Then, fill in the poo and moss-filled hole with grass, moss and soil, and add a few rocks on the top if possible. Voila – what to do if you need a poo 🙂
If you want to take a digging implement, I'd take a trowel. Smaller, lighter and much easier to carry.
If you HAVE to use tissue paper, DO NOT burn it. You'll have to bag it and carry it out with you. In North America they recommend you put toilet tissue in your 'bear box' (which is where your food lives), so be thankful the UK doesn't have bears!
Cheers,
Simon
Thank you so much for this article. I never went camping before and I have no idea what I have to prepare. We are about to go soon so your tips are very helpful to me. Greetings
No problem Charlene – hope you enjoyed your first camping trip!
Hey me and my friend are going camping to Galloway park and want to do a good expedition, where not stupid but we have never done stuff like this before, don't get me wrong AV been campin and that but this is new, do you think it would be stupid and dangerous to go for 1-2 weeks? Personally myself I think I could do it no problem, but don't want any stupid risks to arise, I have done good research on what to take, plus a list and a map, any pointers you could give me would be great
Hi John,
Thanks for the comment – sounds like a good trip!
As much as research can be invaluable, nothing beats experience. I would do a 2-night trip somewhere beforehand, just so you get used to packing, unpacking, knowing what to pack where, and how you manage your food and water supplies.
Once you've done that, you should feel much more comfortable going for a week.
Next, it's time to get planning. Plan your route each day, and plan supplies. Are you going to carry all your food and water for 1 week? Unlikely – so plan how you will replenish food and water, and give your plan to someone back home, just in case any problems arise they know roughly where to find you.
Other than that, leave no trace, make sure your camera is fully charged and enjoy the wild camp and hiking in Galloway Park!
Simon
Great article; about to hit Ben Nevis with wife and 3 kids (8,6 & 5) and have decided to camp the night before. All good common sense and a good confidence boost that we will survive!!! 🙂
Haha, good luck! Just don't go roaming too far for Pokemon 🙂
Hi, nice article with a lot of useful wild camping tips 🙂 If you want share your wildcamping spots with other travellers or if you need some inspiration, feel free to check our project http://www.wildcamping.tips 😉
Can you tell me why you don't recommend or can't use biodegradable toilet paper and bury that in the ground along with your poop? Also biodegradable tampons (clearly YOU don't need these?) If wild camping for a week or so, it's pretty disgusting to have to carry used toilet paper – it'll stink the place out – and what if there's no moss around – what do you do then?
Hey,Thanks for sharing the information and tips for the outdoor.really share good experience and useful could visit my blog for adventure spots.
Love this. If anyone wants to explore more in relation to this – look no further than embersnacks.com
Thanks so much for those camping advice. It’s very useful.
No probs! Thanks for commenting 🙂